Disclaimer: This content is for educational purposes only, not medical advice. Always consult with a doctor before making significant changes to your diet, especially if you have pre-existing health conditions.

If there’s one dessert that never fails to impress, it’s red velvet brownies. With their deep red hue, fudgy texture, and subtle cocoa flavor, these bars are the best of two dessert worlds: the elegance of red velvet cake and the indulgence of a brownie. I first made them on a whim one February afternoon in my tiny Austin kitchen, and they’ve been a staple ever since.
In this guide, I’ll walk you through how to make red velvet brownies from scratch, whether you’re baking for a Valentine’s Day treat, a festive potluck, or just because you’re craving something really good. Expect easy-to-follow steps, my personal baking notes, and plenty of room for creative twists.
By the end of this post, you’ll know exactly what makes these brownies so irresistible—and how to make them disappear from the plate in minutes. Mistakes welcome, perfection not required.
Table of Contents
Key Takeaways: What You Need to Know
- Red velvet brownies combine the soft chew of a brownie with the classic flavor and color of red velvet cake.
- They’re not just red-colored chocolate brownies—they have their own distinct flavor and texture.
- Perfect for Valentine’s Day, date nights, or holiday trays.
- Can be made from scratch or with cake mix shortcuts.
- Keep well refrigerated for up to 5 days or frozen for 2 months.
- Ideal for beginner bakers—no stand mixer needed.
How I Fell in Love with Red Velvet Brownies
What are red velvet brownies, really?
Red velvet brownies aren’t just your average chocolate treat dyed red. They’re a magical mash-up—think red velvet cake, but denser, with that iconic crackly brownie top. The first time I made a batch, I expected them to taste like chocolate with food coloring. I was wrong—in the best way.
The tangy touch of vinegar and buttermilk, a subtle cocoa note, and a velvety smooth bite made them feel like a love letter in dessert form. I served them warm with a scoop of vanilla ice cream, and even my skeptical neighbor (who usually prefers plain old chocolate chip cookies) asked for seconds.
Why red velvet brownies are more than just “brownies in red”
Let’s talk texture. Red velvet brownies walk a delicious line between cakey and fudgy. They’ve got enough structure to slice cleanly into bars, but they still melt in your mouth. And if you’re a swirl fan, oh baby—just wait until we get to the cream cheese topping option in Part 4.
Flavor-wise, red velvet is subtle and elegant. It’s not supposed to smack you in the face with cocoa. Instead, it whispers cocoa, balances sweetness with tang, and brings just enough richness to make each bite feel special.
The best part? You don’t need fancy ingredients or tools. Just a mixing bowl, a whisk, and your favorite 8×8 pan.
Red Velvet Brownies Ingredients – From Scratch or with a Shortcut
What ingredients make red velvet brownies so rich and vibrant?
Red velvet brownies get their character from a mix of pantry basics and one signature twist: red food coloring. But the real magic lies in the balance between cocoa powder, acid (like vinegar or buttermilk), and fat. Here’s a look at the essentials:
Core Ingredients (from scratch):
| Ingredient | Why It Matters |
|---|---|
| Butter (melted) | Adds richness and that classic fudgy brownie base |
| Granulated sugar | Gives sweetness and chew |
| Eggs | Binds everything together and creates that crackly top |
| Unsweetened cocoa powder | Provides the subtle chocolate note |
| Red food coloring | Brings the iconic deep crimson color |
| White vinegar | Adds tang and helps react with the cocoa |
| Vanilla extract | Enhances overall flavor |
| All-purpose flour | Gives structure |
| Salt | Balances the sweetness |
I usually go with just enough cocoa to deepen the flavor, but not so much that it overwhelms the red velvet charm. A little vinegar (yes, really!) gives that signature tang and intensifies the color.
Can I use cake mix to make red velvet brownies?
Absolutely. If you’re short on time or just love an easy win, using a red velvet brownies cake mix works beautifully. You’ll still get that moist, chewy bite with far less prep. I’ve used it in a pinch when making dessert after a busy day—and no one noticed the shortcut.
To upgrade a boxed red velvet cake mix into brownies:
- Use 2 eggs, not 3 (for a denser texture)
- Swap oil for melted butter
- Add chocolate chips or a cream cheese swirl if you’re feeling fancy
Need something just as quick but different? Try these 4-ingredient banana bread or moose farts recipe for more no-fuss bakes.
Pro Tip: If you’re baking for someone with food allergies or preferences, substitute gluten-free flour or check out my vegan jalapeño cheddar bread for more plant-based ideas.
How to Make Red Velvet Brownies (Step-by-Step)
What’s the easiest way to make red velvet brownies from scratch?
Making red velvet brownies is surprisingly simple. No fancy mixers, no obscure ingredients—just one bowl, one pan, and a lot of heart. Below is the method I use every time, plus a few personal tips to avoid the common dry-brownie heartbreak.
Step-by-Step Red Velvet Brownies Recipe
Prep time: 15 minutes
Bake time: 30 minutes
Total time: 45 minutes
Yields: 9 large or 16 small brownies
Ingredients:
- 1/2 cup (1 stick) unsalted butter, melted
- 1 cup granulated sugar
- 2 large eggs
- 2 teaspoons vanilla extract
- 1 tablespoon red food coloring (liquid or gel)
- 1 teaspoon white vinegar
- 1/4 cup unsweetened cocoa powder
- 3/4 cup all-purpose flour
- 1/4 teaspoon salt
Instructions:
1. Preheat & prep
Preheat your oven to 350°F (175°C). Line an 8×8-inch baking dish with parchment paper or grease it lightly.
2. Mix wet ingredients
In a large bowl, whisk together melted butter and sugar until smooth. Add the eggs one at a time, then stir in vanilla, vinegar, and red food coloring. It’ll look vibrant—that’s what we want.
3. Add dry ingredients
Sift in the cocoa powder, flour, and salt. Stir until just combined. Don’t overmix; we’re going for fudgy, not tough.
4. Pour and smooth
Spread the thick, glossy batter evenly into the prepared pan. Use a spatula to smooth the top.
5. Bake
Bake for 28–32 minutes, or until a toothpick inserted in the center comes out with a few moist crumbs. You don’t want it bone dry—remember, fudgy is the goal.
6. Cool and slice
Let the brownies cool completely in the pan before slicing. This helps them set and intensifies the flavor.
Serving tip:
I love pairing these with strawberry banana pudding or even a simple dollop of whipped cream. They also make a fantastic edible gift alongside hard tack candy wrapped in cellophane.

Red Velvet Swirl Brownies + A Real-Life Review
How do you make red velvet brownies with a cream cheese swirl?
This version is a showstopper. It’s the same base recipe, but with a tangy cream cheese swirl marbled throughout. It looks gorgeous, tastes incredible, and adds a touch of luxury to your already-decadent red velvet bars.
Here’s how to make it:
Cream Cheese Swirl Add-On
Swirl ingredients:
- 4 oz cream cheese, softened
- 2 tablespoons granulated sugar
- 1 egg yolk
- 1/2 teaspoon vanilla extract
How to swirl it in:
- After spreading your red velvet brownie batter in the pan, dollop the cream cheese mixture over the top in spoonfuls.
- Use a butter knife to gently swirl it into the top of the batter. Don’t overdo it—less is more!
- Bake as directed. The swirl will bake into a beautiful marble pattern.
Pro Tip: Let these cool completely before cutting. The swirl needs time to set for that clean, bakery-style slice.
Real Reader Review: Love at First Bite
“I made these red velvet brownies with the swirl for my first Valentine’s Day with my boyfriend—and now he requests them every year! The swirl looked so pretty, and the flavor was out of this world. I added chocolate chips to the batter too. Total hit!”
— Marissa B., Dallas, TX
Want another romantic dessert idea? Try these adorable bow and arrow cupcakes—super cute for Valentine’s Day boxes or themed parties.
Storing, Freezing & Reheating Red Velvet Brownies
Can red velvet brownies be refrigerated?
Yes—red velvet brownies store beautifully, especially if you’ve added a cream cheese swirl or frosting. In fact, I think they taste even better the next day after the flavors settle. Here’s exactly how to store them based on how soon you plan to enjoy them.
How to Store Red Velvet Brownies
| Storage Method | Best For | Instructions |
|---|---|---|
| Room Temp | 1–2 days | Store in an airtight container, ideally in a cool, dark place. Skip this if you used cream cheese. |
| Refrigerator | 3–5 days | Place in a sealed container or wrap tightly with plastic wrap. Let come to room temp before serving for best texture. |
| Freezer | Up to 2 months | Freeze individual squares between layers of parchment in a ziplock bag. Thaw overnight in fridge or 1 hour on the counter. |
Quick note: If you’ve made a batch with that cream cheese swirl, skip the counter. Always refrigerate or freeze those to keep them food-safe.
Reheating Tips
- For that just-baked warmth, pop a square in the microwave for 10–15 seconds.
- Want to serve à la mode? Add a scoop of vanilla ice cream right after microwaving—melty, gooey, magic.
These brownies also make a dreamy pairing with cozy drinks like homemade strawberry lemonade or even a creamy oolong milk tea.
Red Velvet Brownie Variations – Cookies, Bars & More
How can I turn this brownie recipe into red velvet bars or cookies?
The beauty of red velvet brownies is their flexibility. With a few tweaks, you can use the same batter to make other irresistible red velvet desserts. Whether you’re craving a cookie, muffin, or even a quick sheet cake, this recipe’s got your back.
Red Velvet Brownie Cookies
These bake up with crisp edges and chewy centers. Perfect for gifting or stacking high on a dessert tray.
To make:
- Chill the brownie batter for 20 minutes.
- Scoop into balls using a cookie scoop.
- Bake at 350°F for 9–11 minutes until set but soft in the middle.
- Optional: Press chocolate chips or white chocolate chunks on top before baking.
Serve with a warm drink or alongside these banana bread cookies for variety on your cookie tray.

Red Velvet Brownies
Equipment
- baking pan
- Mixing bowls
- Rubber spatula
- Measuring Cups & Spoons
- Parchment paper
- Wire cooling rack
Ingredients
- ½ cup 1 stick unsalted butter, melted
- 1 cup granulated sugar
- 2 large eggs
- 1 tsp vanilla extract
- 1 tbsp red gel food coloring
- 1 tsp white vinegar
- ¾ cup all-purpose flour
- ¼ cup unsweetened cocoa powder
- ¼ tsp salt
- ½ cup chocolate chips or chopped nuts
Instructions
- 1️⃣ Preheat oven to 350°F (175°C) and line an 8×8-inch baking pan with parchment paper.
- 2️⃣ In a bowl, whisk together melted butter and sugar until smooth.
- 3️⃣ Add eggs, vanilla, red food coloring, and vinegar. Mix until well combined.
- 4️⃣ Sift in flour, cocoa powder, and salt. Gently fold until just combined.
- 5️⃣ Pour batter into the prepared pan and smooth the top with a spatula.
- 6️⃣ Bake for 28-32 minutes, or until a toothpick comes out with a few moist crumbs.
- 7️⃣ Cool completely before slicing into squares. E
Notes
- For the Best Color: Gel food coloring provides a more vibrant red hue than liquid food coloring.
- Don’t Overmix: Overmixing the batter can result in dense brownies. Stir until just combined.
- Check for Doneness: A toothpick inserted in the center should come out with a few moist crumbs, not wet batter.
- For Extra Fudginess: Slightly underbake the brownies and let them cool completely before slicing.
- Enhance the Flavor: Adding ½ teaspoon of espresso powder deepens the chocolate flavor without making them taste like coffee.
- Make It Fancy: Top with cream cheese frosting or serve with a scoop of ice cream for an indulgent treat.
Nutrition
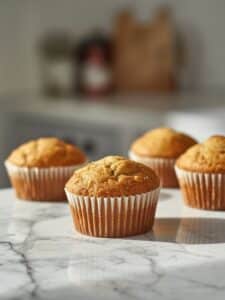
Red Velvet Muffins (aka breakfast-approved brownies)
Yes, we’re calling this breakfast. With a soft crumb and cupcake-like top, these muffins are rich without being overly sweet.
To make:
- Divide the batter into a muffin tin lined with cupcake papers.
- Bake at 350°F for 18–20 minutes until a toothpick comes out clean.
They make a great pair with these bagels with cream cheese for a sweet-salty brunch combo.
Red Velvet Sheet Cake Bars
Craving something sliceable and sharable? Bake your brownie batter in a 9×13 pan for red velvet sheet cake bars.
Tip: Double the recipe and frost with cream cheese frosting or drizzle with white chocolate. These make amazing potluck or party treats—especially with some red velvet cookie croissants on the side like this cookie croissant recipe.
Looking for other creative bakes? Try the coconut pecan cookie recipe or raspberry cookie recipe for fruity twists.

Serving, Sharing
Are red velvet brownies good for Valentine’s Day?
Absolutely. With their romantic red hue and melt-in-your-mouth texture, red velvet brownies are made for Valentine’s Day. Whether you’re baking for a partner, a Galentine’s brunch, or just to treat yourself, these brownies deliver chocolatey bliss with every bite.
Serve them:
- Warm with a scoop of ice cream
- Cut into heart shapes with cookie cutters
- Topped with powdered sugar or cream cheese glaze
Pair them with a cozy drink like Chinese jasmine tea or wrap them up in parchment and twine for sweet edible gifts.
And if you’re building a dessert board, consider adding peach cobbler with cake mix or braided chocolate chip brioche for a stunning variety.
FAQ: Red Velvet Brownies
How to make red velvet brownies?
To make red velvet brownies, combine melted butter, sugar, eggs, vanilla, red food coloring, vinegar, cocoa powder, flour, and salt. Spread in a pan and bake at 350°F for 30 minutes until fudgy and set.
What are red velvet brownies?
Red velvet brownies are a dessert that combines the soft, dense texture of brownies with the subtle cocoa flavor and tanginess of red velvet cake, plus their signature red color.
Are red velvet brownies good for Valentine’s Day?
Yes, red velvet brownies are perfect for Valentine’s Day thanks to their deep red color, indulgent flavor, and elegant presentation. They make a sweet and festive homemade gift.
Can red velvet brownies be refrigerated?
Yes. Red velvet brownies can be refrigerated in an airtight container for up to 5 days. This is especially important if they contain a cream cheese swirl or frosting.
Final Thoughts
Red velvet brownies are the dessert equivalent of a hug—rich, cozy, and always a crowd-pleaser. Whether you’re baking from scratch, using a cake mix, or dressing them up with swirls and frostings, these treats are versatile, beginner-friendly, and deeply satisfying.
Got leftover batter? Turn it into muffins. Feeling festive? Add sprinkles. Want to impress? Go full-on with cream cheese swirls and heart-shaped cutouts.
Just don’t forget to save one for yourself before they vanish.