Disclaimer: This content is for educational purposes only, not medical advice. Always consult with a doctor before making significant changes to your diet, especially if you have pre-existing health conditions.

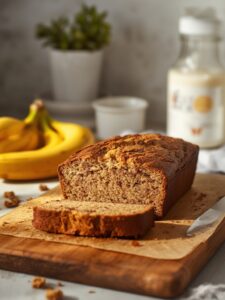
If you’ve been dreaming about that tangy, chewy, golden-crusted sourdough bread, but need to keep things gluten-free, you’re in the right place.
Making gluten free sourdough bread can feel overwhelming at first. You might be wondering:
- Will it rise properly without gluten?
- Is the texture going to be too dense or gummy?
- Can it actually taste like real sourdough?
The short answer? Yes, yes, and absolutely yes.
After testing dozens of versions, playing with different flour blends, and diving into fermentation science, I’ve put together the one gluten free sourdough recipe that hits all the right notes:
✔️ Crusty on the outside
✔️ Soft and chewy inside
✔️ Tangy and rich in flavor
✔️ Completely gluten-free, no weird gums or fillers
Whether you’re baking for health reasons, gut sensitivities, or simply love a good kitchen project, this recipe delivers the real sourdough experience, without the gluten.
In this guide, you’ll learn:
- What makes gluten free sourdough unique
- How to create the perfect flour blend
- Step-by-step baking instructions
- Pro tips for rise, flavor, and texture
- Easy variations and storage hacks
Ready to bake your best loaf yet? Let’s get into it.
Table of Contents
What Makes Gluten Free Sourdough Different?
If you’ve made traditional sourdough before, you’ll notice that gluten free sourdough baking is a whole different ballgame. There’s no stretchy gluten to hold things together, so everything from texture to rise behaves differently, but that doesn’t mean it can’t be just as delicious.
💡 No Gluten = No Structure (At First)
Gluten is the protein that gives wheat-based dough its elasticity and chew. In gluten-free baking, we have to rebuild that structure using a combination of:
- Whole grain gluten-free flours (like sorghum, brown rice, or buckwheat)
- Binding agents (like psyllium husk or chia seeds)
- Proper fermentation time to help the dough develop flavor and strength
It’s not harder, it’s just different. Once you understand how gluten free ingredients behave, you’ll start seeing consistent results.
🧪 Is Sourdough Naturally Gluten-Free?
Nope, that’s one of the biggest myths out there.
Some people think sourdough bread made from regular wheat flour is low in gluten due to fermentation. While it’s lower, it’s not gluten-free, and it’s definitely not safe for people with celiac disease or gluten intolerance.
To be truly gluten-free, your sourdough starter and all ingredients must come from certified gluten-free sources.
🥖 But Why Even Make Gluten Free Sourdough?
Great question, here’s why so many people (even those who can eat gluten) are obsessed with it:
- It’s easier to digest. The long fermentation breaks down starches and makes nutrients more bioavailable.
- The flavor is incredible. That signature sour tang? It’s still here, and it shines even brighter with earthy, whole-grain GF flours.
- You’re in control. No additives, no gums, no mystery ingredients. Just real food.
Gluten free baking has come a long way, and sourdough is proof that you don’t have to compromise flavor for your health.
Ingredients You’ll Need (and Why They Matter)
One of the biggest secrets to gluten free sourdough bread that’s soft, flavorful, and not gummy? It’s all about the ingredients, and understanding what each one does.
This isn’t just a list, it’s the why behind every choice.
🌾 1. Gluten-Free Whole Grain Flours
To build depth of flavor and a hearty crumb, use a blend of naturally gluten-free flours. Here’s what works best:
- Sorghum flour – Adds softness and mild flavor
- Brown rice flour – Light texture and neutral taste
- Buckwheat flour – Earthy and rich, balances the sour notes
- Teff or millet – Optional, but great for nutrition and color
💡 Tip: Use at least 2–3 flours to mimic the complexity of wheat.
🍚 2. Starch Flours
These lighten up the dough and help with moisture:
- Tapioca starch – For stretch and chewiness
- Potato starch – Helps with rise and softness
- Arrowroot powder – Optional; supports even browning
Use starches in moderation, too much = gummy texture.
🌿 3. Psyllium Husk Powder (Non-Negotiable!)
This is your gluten-free secret weapon. Psyllium husk acts like gluten: it absorbs water, adds elasticity, and holds the dough together.
- Use whole psyllium husk or finely ground husk powder
- Do not skip this, it makes or breaks the texture
Bonus: It also boosts fiber, which supports digestion.
💧 4. Filtered Water
Sounds basic, but it matters.
Chlorine in tap water can weaken your sourdough starter, so go with filtered or spring water when possible.
🧂 5. Salt
Enhances flavor, controls fermentation, and strengthens the dough.
Use fine sea salt or Himalayan salt for best results.
🌟 6. Active Gluten-Free Sourdough Starter
Your starter is the heart of the bread.
It should be bubbly, slightly sour, and doubled in size before using.
If you don’t have one yet, check out our [gluten free sourdough starter guide] (← optional internal link).
🧈 7. Optional Add-ins
Want more richness or variety? Try:
- 1–2 tbsp olive oil (for a softer crumb)
- 1 tbsp honey or maple syrup (adds subtle sweetness and browning)
- Herbs, garlic powder, seeds, etc.
Understanding your ingredients = better baking. And now that you’ve got your toolkit ready, let’s make this bread.
Step-by-Step: How to Make Gluten Free Sourdough Bread

This process may look long, but trust me, once you do it once, it becomes second nature. The key is patience (because sourdough takes time), but the payoff is so worth it.
Let’s break it down into easy steps.
🔸 Step 1: Feed Your Gluten-Free Starter
To get a good rise and sourdough flavor, you’ll need a strong, active gluten-free starter.
- Feed your starter 4–6 hours before baking (or the night before, if you refrigerate it after feeding).
- It should be bubbly, risen, and have a tangy smell.
- If it’s not doubling in size after feeding, give it another day or two of regular feedings.
💡 Pro Tip: Use brown rice flour or sorghum flour to feed your starter for the best results.
🔸 Step 2: Mix the Dough
In a large bowl, combine:
- 1 cup active gluten-free starter
- 1 ½ cups gluten-free flour blend
- ½ cup starch (like tapioca or potato starch)
- 1 tbsp psyllium husk (mixed with ¾ cup warm water and rested for 5–10 minutes)
- 1 ½ tsp salt
- Optional: 1 tbsp olive oil or honey
Mix until a sticky dough forms. Gluten-free dough won’t feel elastic like wheat dough, it will be wet and thick, more like a thick batter than a kneadable ball.
🔸 Step 3: Bulk Fermentation
Cover the bowl with a damp cloth or lid and let it rest at room temperature for 4–6 hours, or until it has expanded by about 50%.
- The dough won’t double like gluten bread, look for puffiness, bubbles, and a pleasant sour smell.
- Cooler rooms may require a longer proof; warm rooms might be faster.
📌 Tip: Avoid proofing near heat vents or direct sunlight. Slow and steady wins here.
🔸 Step 4: Shape the Dough
Use wet hands or a spatula to transfer the dough into a parchment-lined loaf pan or a floured proofing basket.
- Smooth the top with damp hands.
- If using a Dutch oven, shape it into a round boule and place it in the basket for final rise.
🔸 Step 5: Final Proof (Optional Overnight)
Cover and let it rest again for:
- 1–2 hours at room temp, or
- Overnight in the fridge for enhanced flavor and better structure
Fridge-proofed dough is easier to score and holds its shape better.
🔸 Step 6: Preheat and Bake
Preheat oven to 450°F (232°C). If using a Dutch oven, preheat it too.
- Score the top with a sharp knife or lame
- Transfer dough into the hot Dutch oven (or bake in pan uncovered)
Bake Time:
- 30 minutes covered (if using a Dutch oven)
- 20–25 minutes uncovered, or until internal temp hits 205°F–210°F
💡 Crust getting too dark? Tent with foil for the last 10 minutes.
🔸 Step 7: Cool Before Slicing
Let the loaf cool completely (at least 1–2 hours) before slicing, seriously.
Why? It’s still setting inside, and slicing too soon = gummy bread.
Gluten Free Sourdough Timeline at a Glance
Making sourdough isn’t complicated, it just takes a little planning. Here’s a simple breakdown of the full process, from feeding your starter to slicing your freshly baked loaf.
📋 Same-Day Baking Schedule
If starting in the morning:
| Step | Time | Notes |
|---|---|---|
| Feed starter | 8:00 AM | Should be bubbly by noon |
| Mix dough | 12:00 PM | After starter is active |
| Bulk fermentation | 12:15–4:15 PM | Dough should puff up 50% |
| Shape & final proof | 4:30–6:00 PM | Room temp proof |
| Bake | 6:00 PM | 45–55 mins total |
| Cool & slice | 7:00–8:00 PM | Wait at least 1 hour |
❄️ Overnight Option (Preferred for Flavor & Structure)
| Step | Time | Notes |
|---|---|---|
| Feed starter | Evening before | Let it activate overnight |
| Mix dough | 7:00 AM | Day of baking |
| Bulk ferment | 7:15–11:15 AM | 4 hours at room temp |
| Shape & cold proof | 11:30 AM | Place in fridge until ready |
| Bake | Same evening or next morning | Bake directly from fridge |
💡 Tip: Use the fridge proofing method for more complex flavor, better crust, and easier dough handling.
Tips for a Better Rise and Texture
If your gluten free sourdough bread turns out dense, gummy, or flat, don’t worry. You’re not doing anything wrong. Gluten-free baking has its quirks, but with a few tweaks, you can get that lofty rise, chewy crumb, and beautiful crust every single time.
Here’s what works:
🌡️ 1. Mind the Room Temperature
Fermentation loves consistency.
Too cold? Your dough might not rise enough.
Too warm? It could over-ferment and collapse.
✅ Ideal range: 70–75°F (21–24°C)
💡 Not warm enough? Use your oven with just the light on, or place the bowl near (not on) a warm stovetop.
🌿 2. Psyllium Husk Is Your Structure
This isn’t optional, it’s the gluten-free glue that gives the dough elasticity and holds in air bubbles.
- Don’t skip or reduce the amount
- Always let psyllium soak fully in warm water before mixing
- Use high-quality psyllium husk powder (not whole flakes unless specified)
🔁 No psyllium? Chia or ground flax can work in a pinch, but the rise won’t be as strong.
🧂 3. Salt at the Right Time
Salt strengthens the dough and balances fermentation, but adding it too early can weaken your starter’s activity.
✅ Mix it after the starter is added, not before.
💦 4. Hydration = Texture Control
The dough should be thick and sticky, not pourable or stiff like cookie dough.
Too dry? You’ll get a crumbly loaf.
Too wet? It may collapse or stay gummy inside.
💡 When in doubt, start slightly wetter, you can always adjust during shaping.
5. Use a Dutch Oven (if you can)
Baking in a covered pot traps steam, which:
- Gives your loaf a better rise (oven spring)
- Helps create a crisp, golden crust
- Mimics a professional bread oven
No Dutch oven? Bake with a tray of water in the bottom of your oven to add steam.
🍽️ 6. Always Let It Cool Completely
It’s tempting to slice into that beautiful loaf while it’s hot, but resist!
Warm gluten free bread = gummy texture.
Let it rest at least 1–2 hours to finish setting inside.
Flavor Variations & Mix-Ins

Once you’ve mastered the base gluten free sourdough bread recipe, the possibilities are endless. You can keep it simple and rustic, or turn it into something bold, herby, cheesy, or even sweet. These variations not only change the flavor, they also make your loaf look (and smell) next-level.
Here are some delicious ideas to get you inspired:
🌿 1. Herb & Garlic Sourdough
Add to the dough:
- 1 tbsp dried rosemary, thyme, or oregano
- ½ tsp garlic powder or 1 tsp roasted garlic purée
Top with a brush of olive oil and a pinch of sea salt before baking.
Perfect for: sandwiches, soups, or serving with olive oil + balsamic
🧀 2. Cheddar Jalapeño
Mix in:
- ½ cup shredded sharp cheddar
- 1 small jalapeño, finely chopped (remove seeds for less heat)
This version has a nice kick and melts beautifully into the crumb.
Perfect for: savory toast, grilled cheese, or chili night
🥜 3. Seeded Multigrain Style
Roll the shaped dough in:
- Sunflower seeds
- Pumpkin seeds
- Sesame, poppy, or flax seeds
You can also mix 2–3 tablespoons directly into the dough for a crunchy, hearty vibe.
Perfect for: health-forward meals, breakfast toast, and dipping in soup
🍯 4. Cinnamon Raisin (Sweet Option)
Add to the dough:
- 1 tsp cinnamon
- 2 tbsp maple syrup or honey
- ⅓ cup raisins or chopped dates
Optional: swirl in a cinnamon-sugar ribbon just before shaping.
Perfect for: breakfast toast, nut butter spreads, or French toast
🍅 5. Olive & Sun-Dried Tomato
Add to the dough:
- ⅓ cup chopped kalamata or green olives
- 2 tbsp chopped sun-dried tomatoes
- ½ tsp dried basil or Italian herbs
Savory, tangy, and loaded with Mediterranean flavor.
Perfect for: appetizer boards, sandwich bases, or dipping in olive oil
💡 Tips for Mix-Ins:
- Always fold extras in during shaping (after bulk fermentation)
- Reduce water slightly if ingredients are very moist
- Let flavored loaves proof a bit longer, they can be heavier
Storage & Freezing Instructions
One of the best things about this gluten free sourdough bread? It holds up really well, whether you want to enjoy it all week or freeze it for later. The trick is storing it the right way so it stays fresh, moist, and delicious.
🥖 How to Store Gluten Free Sourdough Bread
🔸 Room Temperature (Short-Term)
- Let the loaf cool completely
- Store in a linen bread bag, paper bag, or wrapped in a clean kitchen towel
- Place in a bread box or sealed container
- Shelf life: 2–3 days at room temp
Skip plastic wrap, it locks in moisture and can leave your crust soft instead of crisp.
🔸 Refrigerator (Optional)
You can refrigerate, but be aware: the fridge can dry out gluten free bread faster.
- Wrap loaf in parchment, then place in a resealable bag
- Slice before storing so you can pull out just what you need
- Shelf life: Up to 5 days
❄️ How to Freeze It (Best for Longer Storage)
Freezing is ideal if you’ve baked extra or want to meal prep.
🔹 For a Whole Loaf:
- Cool completely
- Wrap tightly in plastic wrap or foil
- Place in a freezer-safe zip bag, removing as much air as possible
- Label and freeze for up to 2 months
🔹 For Sliced Bread:
- Slice first (this is key!)
- Separate slices with parchment paper
- Freeze in a zip bag or airtight container
Now you can grab a slice whenever you need it, no thawing the whole loaf.
🔁 How to Reheat Frozen Sourdough
👉 For whole loaves:
- Thaw at room temp for 3–4 hours
- Warm in the oven at 300°F (150°C) for 10–15 minutes
👉 For slices:
- Toast directly from frozen
- Or microwave with a damp paper towel for 15–20 seconds
💡 Pro tip: Toasting brings back the crust’s crispness and enhances the sourdough flavor.
Frequently Asked Questions (FAQs)
How long does gluten-free sourdough bread stay fresh at room temperature?
Homemade gluten-free sourdough bread is best enjoyed within 1–2 days when stored at room temperature. To maintain freshness, wrap the cooled loaf in a clean kitchen towel or place it in a paper bag. Avoid plastic bags, as they can trap moisture and promote mold growth.
Can I freeze gluten-free sourdough bread?
Yes, freezing is an excellent way to extend the shelf life of your bread. Once the loaf has cooled completely, slice it and wrap the slices tightly in plastic wrap or foil. Place the wrapped slices in a freezer-safe bag, pressing out extra air to prevent freezer burn. You can keep frozen gluten-free bread for up to two months without losing quality or flavor.
How do I thaw and reheat frozen gluten-free sourdough bread?
To thaw, remove the slices you need and let them sit at room temperature for about 30 minutes. For a faster option, toast the slices straight from frozen. This keeps the texture crisp and avoids sogginess.
Why does my gluten-free sourdough bread turn out gummy?
A gummy texture can be caused by:
Underbaking – Always bake to at least 200°F (93°C) internal temperature.
Too much moisture – Stick to the recipe’s measurements.
Slicing too soon – Let the bread cool fully to set the crumb.
Can I use a bread box to store gluten-free sourdough bread?
Yes! A bread box is a great option to keep the crust crisp without drying out the loaf. Just make sure the bread has cooled completely before storing, and don’t seal it too tightly, a little airflow helps prevent moisture buildup.

Gluten Free Sourdough Bread
Equipment
- Mixing bowl
- Dutch oven or loaf pan
- Bread lame or knife
- Spatula or spoon
- Parchment paper
Ingredients
- 1 cup Active gluten-free starter Bubbly and recently fed
- 1 ½ cups GF flour blend Sorghum brown rice, or buckwheat based
- ½ cup Tapioca starch Helps with structure and chew
- 1 tbsp Psyllium husk Mixed with water see below
- ¾ cup Warm water Combine with psyllium before mixing
- 1 ½ tsp Salt Sea salt or pink salt
- 1 tbsp Olive oil optional Adds softness and flavor
- 1 tbsp Maple syrup or honey optional For mild sweetness and browning
Instructions
- Feed your gluten-free sourdough starter 4–6 hours before baking until bubbly and doubled.
- In a small bowl, mix psyllium husk and warm water, then let it sit for 5–10 minutes to form a gel.
- In a large bowl, combine all ingredients, including the psyllium gel, and stir until a thick, sticky dough forms.
- Cover and let the dough rest at room temperature for 4–6 hours or until it rises by about 50%.
- Shape the dough and transfer it into a parchment-lined Dutch oven or loaf pan. Smooth the top with wet hands.
- Let it proof again for 1–2 hours at room temp or refrigerate overnight for better flavor.
- Preheat oven to 450°F (232°C). Score the dough and bake for 30 minutes covered, then 15–20 minutes uncovered.
- Cool completely before slicing (at least 1–2 hours).
Notes
- For a crustier loaf, bake in a Dutch oven with the lid on for steam.
- For flavor variations, try adding herbs, seeds, or chopped olives.
- Always use certified gluten-free ingredients if baking for someone with celiac disease.
Nutrition
Final Thoughts
Making your own gluten free sourdough bread at home might sound like a big project, but once you try it, you’ll wonder why you waited so long. With the right flour blend, a little patience, and a bubbly starter, you can create a loaf that’s:
✔️ Crusty on the outside
✔️ Soft and chewy inside
✔️ Rich in flavor and 100% gluten-free
No fillers. No gums. Just real ingredients, naturally fermented and made with love.
Whether you’re gluten-free by choice or necessity, this recipe gives you that authentic sourdough taste, without compromise.
🍽️ Keep the Baking Going…
Want more gluten-free kitchen inspiration? Try these next:
- Gluten Free Salads – Perfect side dishes to pair with your sourdough
- Homemade Salad Dressings – Easy, fresh, and flavorful toppings
- Lemon Balm Drink for Weight Loss – A soothing, healthy sip to enjoy with your slice
- Natural Mounjaro Recipe – Explore natural wellness trends you can make at home
Baked this loaf? Tag us with your results or leave a comment below, and don’t forget to share this recipe with your gluten-free foodie friends!